Wound Care Module
Introduction
Welcome to the wound care module! Here you will learn how to create your own completely customizable wound care task trainers, from simple lacerations to complex draining wounds. Along with each section there will be:
- A how-to guide including a materials list,
- A step-by-step instructions on creation of the task trainer,
- High quality pictures demonstrating key steps for creation and use,
- A video with audio descriptions of performing the creation, and
- A cost breakdown for the wound task trainer, including estimated shipping costs based on urban settings and remote settings.
Once you have created your task trainer:
- Click the ‘Set-up Guide’ to learn what supplies you should lay out and how you should set-up your task trainer to promote learner success.
- Click the ‘Teaching / Feedback’ section to find key frameworks for how to teach this skill and provide constructive feedback to participants based on their level of competency.
- Click the ‘Evaluation and Resources’ section to find peer-reviewed and evidence-based checklists that you can use to evaluate your participants or yourself on the skill of wound care.
Wound Care Set-up Guide
For Simple Wounds [LINK], and Complex Wounds – Burns [LINK] & Undermining/Tunneling, go to Skills Station Set-up [LINK].
For Complex Wounds
- Purulent or Draining Wound:
- Using a small cup, mix petroleum jelly and food colouring to achieve the desired look for the substance you are trying to recreate.
- Taking a syringe (10cc or 20cc work well), remove the plunger. Then, using a tongue depressor, scoop the petroleum jelly into the syringe. Replace the plunger and push contents to the end. Using a blunt tip cannula, inject the petroleum jelly into the wound until some oozes out of the wound. *Note that it may be difficult to push the thick petroleum jelly out of the blunt tip cannula

- Bleeding Wound:
- Prepare your simulated blood by adding red food colouring either water in a cup or injected into a saline bag
- Either a) draw up simulated blood into syringe, or b) prime gravity line with saline bag
- Attach the syringe or tubing to the tube structure in your bleeding wound task trainer
- As needed, hide the tubing under a towel, cloth, etc.
Skill Station Set-up
| Wound Care Set-up | Picture |
|---|---|
| |
Teaching / Feedback
Pendleton (1984) Method for Feedback
- Ask the learner what went well
- Tell the learner what went well
- Ask the learner what could be improved
- Tell the learner what could be improved
N.O.D.O.F.F tool for Technical Skills Retention (Ibrahim, 2017)
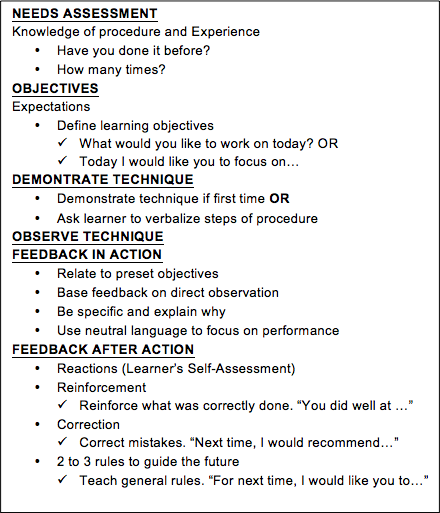
Procedural Skill Teaching Rubric
- Needs Assessment
- Objectives
- Demonstrate
- Observe
- Feedback in Action
- Feedback after Action
Evaluation – Best Practice Resources
- RNAO Assessment and Management of Pressure Injuries for the Interprofessional Team, Third Edition, https://rnao.ca/sites/rnao-ca/files/Pressure_Injuries_BPG.pdf
- Appendix I – Pressure Injury Assessment Tools - Page 130
- Appendix K - Assessment for Infection – Page 135
- Appendix L - Swabbing Technique – Page 137
- Appendix W - Education Resources – Page 153
- Wounds Canada BEST PRACTICE RECOMMENDATIONS FOR THE Prevention and Management of Wounds https://www.woundscanada.ca/health-care-professional/resources-health-care-pros/library
- RNAO Assessment and Management of Foot Ulcers for People with Diabetes, Second Edition, [LINK]
- Appendix J – Wound Swabbing Technique - Page 127
- Appendix R - A Guide to Dressing Foot Wounds – Page 147
- Royal Victoria Regional Health Centre – Wound Care: Wound Assessment and Management https://ppno.ca/wp-content/uploads/2021/08/Wound-Care-Wound-Assessment-and-Management.pdf
- NSWOC Wound Care Instrument - https://www.nswoc.ca/_files/ugd/9d080f_977c08bf54a740ad997e25a07e615b5a.pdf
- Canadian Medical Association Journal – Dog Bites - https://www.cmaj.ca/content/190/4/E113