Suture Care Module
Introduction
Welcome to the suturing and stapling module! Here you will learn how to create your own completely customizable suturing and stapling pads, including ones with variable complexity and depths, and ones that can be attached to a manikin or standardized patient. Along with each section there will be:
- A how-to guide including a materials list,
- Step-by-step instructions on creation of the task trainer,
- High quality pictures demonstrating key steps for creation and use,
- A video with audio descriptions of performing the creation, and
- A cost breakdown for the wound task trainer, including estimated shipping costs based on urban settings and remote settings.
Once you have created your task trainer:
- Click the ‘Set-up Guide’ to learn what supplies you should lay out and how you should set-up your task trainer to promote learner success.
- Click the ‘Teaching / Feedback’ section to find key frameworks for how to teach this skill and provide constructive feedback to participants based on their level of competency.
- Click the ‘Evaluation and Resources’ section to find peer-reviewed and evidence-based checklists that you can use to evaluate your participants or yourself on the skill of wound care.
Suturing & Stapling Set-up Guide
Attaching to a manikin or standardized patient
Place the suture/staple module on a SAM splint or equivalent soft splint. For extra security, glue down the module to the splint. Note: check the quality of the splint prior to placing the module on top to ensure sharps do not penetrate the structure.
Secure the module to the anatomical location using either:
- Elbow or arm strap (limbs). Example: https://www.amazon.ca/AetherGear-Forearm-Tennis-Badminton-Lifting/dp/B0757BLZBB/ref=sr_1_8?crid=YDJ1L319BQV5&keywords=arm+strap&qid=1692627107&sprefix=arm+strap%2Caps%2C92&sr=8-8
- Buckle straps (limbs, abdomen, torso). Example: https://www.amazon.ca/Ayicoo-2-Pack-Straps-Release-Buckle/dp/B06XNK5H7G/ref=sr_1_8?crid=1BEW6781AT20R&keywords=buckle%2Bstrap%2Bsmall%2Bwidth&qid=1692627189&sprefix=buckle%2Bstrap%2Bsmall%2Bwidth%2Caps%2C113&sr=8-8&th=1
- Hospital IV tourniquet (limbs). Note: this should only be for skills stations or cases where the standardized patient or manikin will be sitting/lying still for security of placement. Note: circulation of standardized patient should be assessed if tourniquet is on for long periods.
\
Skill Station Set-up
| Suture Care Set-up | Picture |
| • Place suture care task trainer with indicated size, approximate location, depth, drain, exudate, healing stage and cause of wound on table- Cover table with disposable drape |
- Sterile saline container
- Sharps container
- Box of sterile gloves
- For each participants:- Tray covered with (huck) towel
- 1 vial of Sim Lidocaine (off the tray)
- 1 vial of Sim Lidocaine with Epinephrine (off the tray)
- Disposable scalpel (#10) (off the tray)
- 10cc syringe (off the tray)
- 18G and 25G needles (off the tray)
- Scissors (on the tray)
- Toothed forceps (on the tray)
- Needle driver (small) (on the tray)
- Metal cup (on the tray)• Gauze (size and number)• Tape or dressing strip (specify)• Waterproof bag• Optional: Antiseptic ointment (specify)• Optional: Cleansing spray (specify) | IMAGE PLACEHOLDER |
| Staple Set-up | Picture |
| • Place staple care task trainer with indicated size, approximate location, depth, drain, exudate, healing stage and cause of wound on table• Sterile and non-sterile gloves - Sterile 4 x 4 inch gauze, tubular gauze bandage, and tape for dressing |
- Sterile drapes or disposable blue pad
- Irrigation solution (eg, sterile normal saline)
- 30 to 60 mL syringe with 18 to 19 gauge IV catheter or irrigation device with splash shield (eg, Zerowet)
- Staple device
- Adson forceps (forceps with teeth)
- Sim Antibiotic ointment (eg, bacitracin)
- Sim local anaesthesia (as applicable)
- Sim antiseptic cleaner (as applicable)
- Staple remover• Waterproof bag | IMAGE PLACEHOLDER (Reference: https://www.merckmanuals.com/en-ca/professional/injuries-poisoning/how-to-care-for-wounds-and-lacerations/how-to-repair-a-laceration-with-stapling and https://www.uptodate.com/contents/closure-of-minor-skin-wounds-with-staples) |
Teaching / Feedback
Pendleton (1984) Method for Feedback
| 1. Ask the learner what went well |
| 2. Tell the learner what went well |
| 3. Ask the learner what could be improved |
| 4. Tell the learner what could be improved |
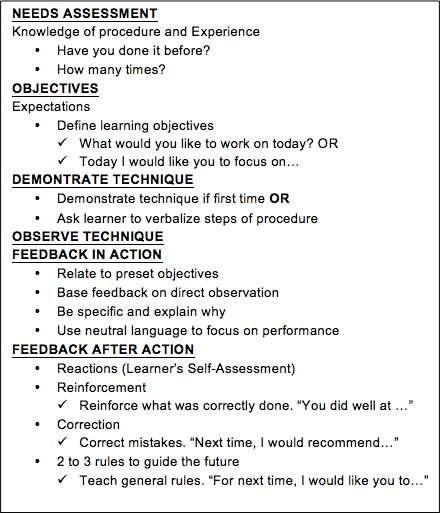
N.O.D.O.F.F tool for Technical Skills Retention (Ibrahim, 2017)
Procedural Skill Teaching Rubric
- Needs Assessment
- Objectives
- Demonstrate
- Observe
- Feedback in Action
- Feedback after Action
Evaluation – Best Practice Resources (*Disclaimer: does not override institutional or regulatory guidelines about scope of practice, proper steps, or equipment used).
- Streitz, M. (2022). How to Repair a Laceration with Stapling. Merck Manuals. https://www.merckmanuals.com/en-ca/professional/injuries-poisoning/how-to-care-for-wounds-and-lacerations/how-to-repair-a-laceration-with-stapling __
- Streitz, M. (2022). How to Repair a Laceration with Simple Interrupted Sutures. Merck Manuals. https://www.merckmanuals.com/en-ca/professional/injuries-poisoning/how-to-care-for-wounds-and-lacerations/how-to-repair-a-laceration-with-simple-interrupted-sutures#v52124688 __
- Lipsett, S. (2021). Closure of Minor Skin Wounds with Staples. UptoDate. https://www.uptodate.com/contents/closure-of-minor-skin-wounds-with-staples __
- deLemos, D. (2022). Skin Laceration Repair with Suture. UptoDate. https://www.uptodate.com/contents/skin-laceration-repair-with-sutures?topicRef=6320&source=see_link __
- NSWOC wound care guide. https://www.nswoc.ca/_files/ugd/9d080f_977c08bf54a740ad997e25a07e615b5a.pdf