IV and US IV Insertion
IV Insertion and Ultrasound Guided IV Insertion Module
Introduction
Welcome to the intravenous (IV) and ultrasound guided peripheral IV (USPIV) insertion module! Here you will learn how to create your own completely customizable IV insertion task trainer, including ones with variable complexity and depths, ones that can be ultrasounded using a point-of-care ultrasound machine, and ones that can be attached to a manikin or standardized patient. Along with each section there will be:
- A how-to guide, which includes a materials list
- Step-by-step instructions for creation of the task trainer
- Pictures demonstrating key steps for creation and use of the task trainer
- A video with audio descriptions of performing the creation, and;
- A cost breakdown for the task trainer, including estimated shipping costs based on urban settings and remote settings
Once you have created your task trainer:
- The ‘Skills Station Set-up Guide’ will identify what supplies you should lay out and how you should set-up your task trainer to promote learner success.
- The ‘Teaching / Feedback’ section will provide key frameworks for how to teach this skill and provide constructive feedback to participants based on their level of competency.
- The ‘Evaluation and Resources’ section will list peer-reviewed and evidence-based checklists that you can use to evaluate your participants or yourself on the skill of IV insertion.
Attaching to a manikin or standardized patient
- Place the insertion module on a SAM® splint or equivalent soft splint. For extra security, glue down the module to the splint. Note: check the quality of the splint prior to placing the module on top to ensure sharps do not penetrate the structure.
- Secure the module to the arm/limb using either:
- Elbow or arm strap. Example: https://www.amazon.ca/AetherGear-Forearm-Tennis-Badminton-Lifting/dp/B0757BLZBB/ref=sr_1_8?crid=YDJ1L319BQV5&keywords=arm+strap&qid=1692627107&sprefix=arm+strap%2Caps%2C92&sr=8-8
- Buckle strap. Example: https://www.amazon.ca/Ayicoo-2-Pack-Straps-Release-Buckle/dp/B06XNK5H7G/ref=sr_1_8?crid=1BEW6781AT20R&keywords=buckle%2Bstrap%2Bsmall%2Bwidth&qid=1692627189&sprefix=buckle%2Bstrap%2Bsmall%2Bwidth%2Caps%2C113&sr=8-8&th=1
- Hospital IV tourniquet. Note: this should only be for skills stations or cases where the standardized patient or manikin will be sitting/lying still for security of placement. Important: circulation of standardized patient should be assessed if tourniquet is on for long periods.
Skill Station Set-up Guide
- IV insertion task trainer
- 20cc syringe with mock blood or maintenance fluid with red food colouring
- 20g (or smaller) IV catheters
- Alcohol wipes
- Tegaderms™ or other IV securement bandage
- Gauze (4X4 or 2x2)
- Tourniquets (if using manikin arm or SP)
- 10cc flushes
- Extension sets
- Transpore™ tape or other like clear medical tape
- Sharps container
- Garbage disposal
- If ultrasound – ultrasound gel & point of care ultrasound machine
Teaching / Feedback
Pendleton (1984) Method for Feedback
- Ask the learner what went well
- Tell the learner what went well
- Ask the learner what could be improved
- Tell the learner what could be improved
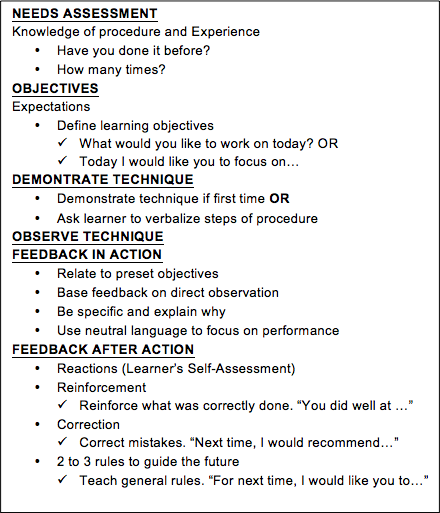
N.O.D.O.F.F tool for Technical Skills Retention (Ibrahim, 2017)
- Needs Assessment
- Objectives
- Demonstrate
- Observe
- Feedback in Action
- Feedback after Action
Evaluation – Best Practice Resources
- RNAO Assessment and Management of Pressure Injuries for the Interprofessional Team, Third Edition, https://rnao.ca/sites/rnao-ca/files/Pressure_Injuries_BPG.pdf
- Appendix I – Pressure Injury Assessment Tools - Page 130
- Appendix K - Assessment for Infection – Page 135
- Appendix L - Swabbing Technique – Page 137
- Appendix W - Education Resources – Page 153
- Wounds Canada BEST PRACTICE RECOMMENDATIONS FOR THE Prevention and Management of Wounds https://www.woundscanada.ca/health-care-professional/resources-health-care-pros/library
- RNAO Assessment and Management of Foot Ulcers for People with Diabetes, Second Edition.
- Appendix J – Wound Swabbing Technique - Page 127
- Appendix R - A Guide to Dressing Foot Wounds – Page 147
- Royal Victoria Regional Health Centre – Wound Care: Wound Assessment and Management https://ppno.ca/wp-content/uploads/2021/08/Wound-Care-Wound-Assessment-and-Management.pdf
- NSWOC Wound Care Instrument - https://www.nswoc.ca/_files/ugd/9d080f_977c08bf54a740ad997e25a07e615b5a.pdf
- Canadian Medical Association Journal – Dog Bites - https://www.cmaj.ca/content/190/4/E113
Cost Breakdown and Material Sourcing
IV Module Cost Breakdown