Intraosseous (IO) Insertion Task Trainer Instructions
Revised: November 2023
Time Commitment: 30 minutes
Creator: Sébastien Perth Reviewer: Jacob Vanderploeg
Content warning: drill, needles, simulated blood
What you will need
- Fiberglass casting material (ideally white – but any colour will do) (Scotchcast™ material used for trainer below)
- Cotton balls or non-woven 2x2 gauze (cotton balls used for trainer video)
- Luer-lock Syringe (60cc for adult; 20-30cc for child)
- Bowl or large disposable cup of water that fiberglass is submerged into
- 3-inch non-woven gauze roll
- 3-way stop-cock
- Secondary IV line or any line that can push fluids (e.g. primary gravity, nitro tubing or filter set, etc.)
- 100cc mini-bag of IV fluid (any maintenance IV fluid) (great time to use up expired fluids on-site)
- Blunt tip needle
- 3cc or 5cc syringe
- Red food colouring
- Optional: Elastic band / Pressure bag (add pressure to mini-bag)
Note: when using the trainer a 15mm (red/pink) Teleflex Arrow™ EZ-IO™ needle will usually be sufficient for the 20-30cc syringe, the 25mm (blue) Teleflex Arrow™ EZ-IO™ needle is usually needed for the 60cc syringe to obtain proper feedback. Be cautious using the 45mm Teleflex Arrow™ EZ-IO™ needle, even with the 60cc syringe, as it may be too long for this trainer.
Assembly Instructions
| Assembly Instructions | Pictures |
|---|---|
| Step 1: Wrap larger (60cc or 20-30cc) syringe in non-woven gauze 1-2x. Does not have to be tight. Note: you can pull out plunger to make it easier to work with syringe. Purpose: this will allow you to remove the syringe at the end to replace it after too many punctures. | 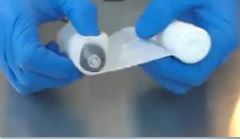 |
| Step 2: Begin rolling the fiberglass casting around the non-woven gauze approximately 2 turns. Recommended to apply dry and keep tackiness. Purpose: locks the gauze into place and allows the cotton balls to stick for anatomical features. | 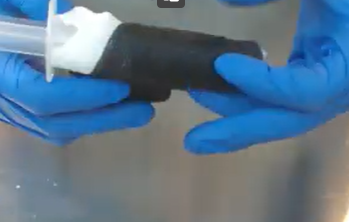 |
| Step 3: Shape the task trainer with cotton balls as reference points for head of bone. Purpose: allows learners to practice land-marking. | 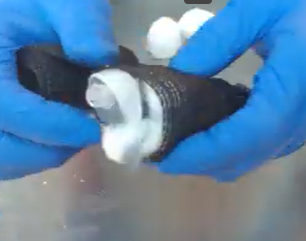 |
| Step 4: Continue to wrap fiberglass over cotton balls and rest of gauze/syringe until you reach the level of anatomical real-ness desired. | |
| Step 5: Submerge the appliance in water, smooth out fiberglass edges with fingers while curing. | 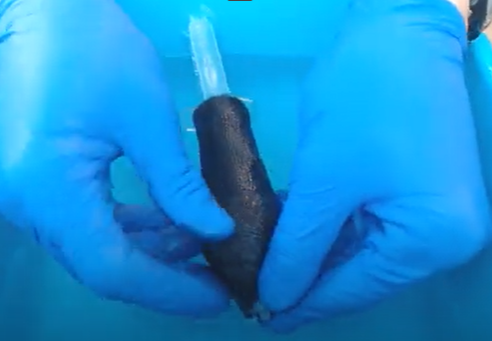 |
| Step 6: Add 3-way stop-cock and allow to cure. It should take approximately 10 minutes to cure. Purpose: Adding the 3-way stop cock now ensures you have the proper length for accessing the syringe later, and allows you more length to rest the trainer to dry. | 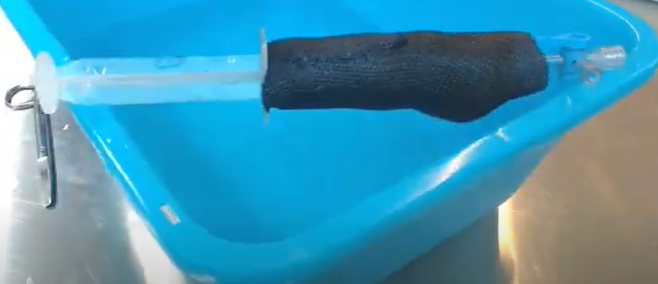 |
| Optional: Step 7: Prepare your 100cc IV mini-bag with 3-5cc of a food colouring/water mixture administered via blunt tip needle and smaller syringe. Purpose: will add realism to blood return feedback. | |
| Step 8: Connect IV mini-bag to secondary line. Connect secondary line to 3-way stop-cock. Pull back on syringe to fill with fluid. Optional: place silicone skin layer on top of IO bone. Purpose: allows for feedback of blood return. 3-way stop-cock stops continuous flow/pressure. | 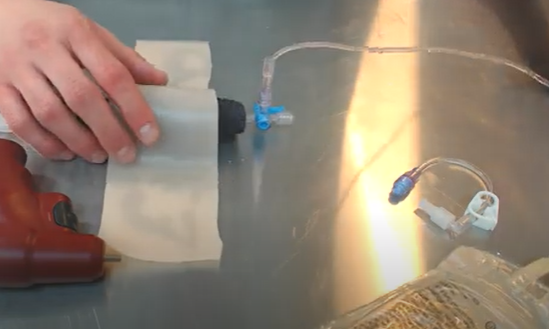 |
Attaching to a manikin
Place the insertion module on a SAM® splint or equivalent soft splint. For extra security, glue or duct tape down the module to the splint. Note: check the quality of the splint prior to placing the module on top to ensure sharps do not penetrate the structure. Extra securement can be added by embedding the IO module into a pool noodle as demonstrated in the CPR module.
Secure the module to the manikin arm/limb using either:
To accept fluids
- Add a 1L IV empty bag to administer fluids into attached to the 3-way stopcock via an IV line. The bag should be placed lower than the IO task trainer to allow for gravity flow.